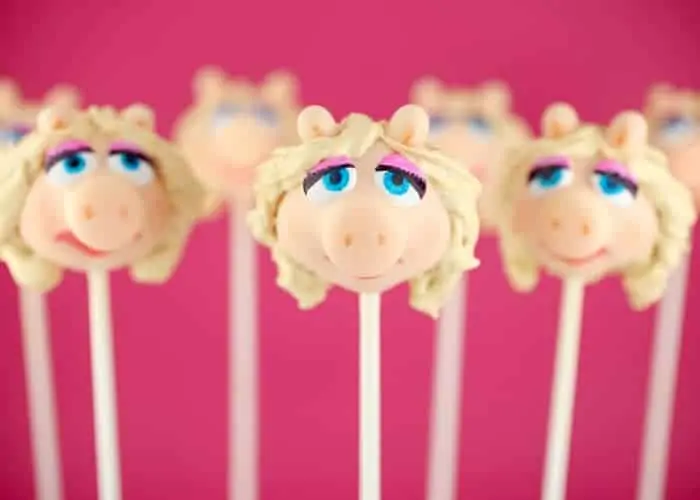
Since she would have it no other way, I saved the best for last! I think we all love Miss Piggy with her unflinching confidence and aspiration, plus her love of shoes! Calm and demure (most of the time, er…at least some of the time), with a taste for fashion and good food. Yep, I think Miss Piggy and I would get along just fine.
Thanks, Bakerella!
Print{Recipe} Disney The Muppets: Miss Piggy Cake Pops
- Total Time: 1 hour
Ingredients
Scale
- 1 box cake mix (bake as directed on box for 13x9 cake)
- 1 16 oz can of ready made frosting
- Wax paper
- Baking sheets
- Peach candy coating
- White candy coating
- Yellow, white and peanut butter candy coating
- White licorice buttons (from licorice bridge mix)
- White chewy locorice candies (such as Good & Plenty) with ends cut off
- White mint lentils
- Pink, peach, blue and black edible ink pens
- Toothpicks
- Paper lollipop sticks
- Styrofoam block
Instructions
- After cake is baked and cooled completely, crumble into a large bowl.
- With a large spoon, mix thoroughly with about 3/4 of the can of frosting. You won’t need the rest.
- Roll mixture into quarter size cake balls and place on a wax paper covered baking sheet.
- Place cake balls in the freezer for about 15 minutes to firm up. You can transfer them to the refrigerator to keep chilled and avoid freezing.
- When they are firm, shape half of the cake balls to resemble Miss Piggy’s head. First, reshape into an oval. Then pinch the top and bottom of the left and right side. To help with the shaping, place a licorice button, round side down in the center. This will help form her cheeks. Then insert the side of a candy coating wafer to form an indentation for her mouth.
- Melt peach candy coating together with some white candy coating to achieve a lighter shade. Melt candy coating in a heat-proof plastic bowl so that the coating is at three to four inches deep for easier dipping. Melt in the microwave in 30 second intervals on low, stirring in between. Repeat until melted and smooth.
- Then dip the rounded side of the licorice button in coating and place on Miss Piggy’s face for her snout. Dip two prepared white chewy licorice candies in melted coating and insert position for her ears.
- Repeat with remaining shaped cake balls and return the cake pops to the refrigerator to chill and maintain firmness before dipping.
- Remove a couple of shaped cake balls from the refrigerator at a time to work with.
- Dip the tip of a lollipop stick into the melted coating and insert into the bottom of Miss Piggy’s head. Carefully dip the entire cake pop with ears and snout attached into the bowl of melted candy coating. Dip and remove in one motion without stirring. Make sure the entire cake ball is covered. Using a deep bowl is helpful here. If your coating is too thick, you can add a little vegetable oil or shortening to help thin it and make it easier to work with.
- Remove and allow any excess coating to fall off the pop and back into the bowl.
- Before the coating sets, attach two white mint lentil candies in position for the eyes. Repeat with the remaining Miss Piggy cake pops.
- Place in a styrofoam block to dry.
- Here’s an example of how the candies are packaged, but you could also use chocolate white-shelled candies (such as M&M’s) if these are hard to find. Miss Piggy’s eyes will just be a bit rounder.
- When dry, use pink and blue edible ink pens to draw on the eye details.
- Use a black edible ink pen to finish off the eyes and eyelashes.
- Use a peach edible ink pen to draw details on her snout and ears and a pink edible ink pen to draw her mouth.
- To create the color for her hair, melt yellow, white and peanut butter or butterscotch candy melts together to achieve her beige blonde locks. (For every peanut butter candy coating wafer, use three yellow and three white wafers.)
- Let the coating set for a few minutes to cool and thicken. Then use a toothpick to apply coating for hair.
- Once you apply an entire layer, let it dry, so you can apply more coating on top to build up the fullness of her hair. Apply the coating with your toothpick in away that resembles curls by dragging the along the contour of her face and then towards the back of her head.
- Keep layering the coating on until her hair is full enough. Let dry completely in a styrofoam block.
- You can wrap in treat bags tied with a ribbon and/or store them on the counter or in an airtight container.
- Prep Time: 1 hour
With secret, signature, celebrity cameos, Disney’s THE MUPPETS opens in theaters everywhere on November 23rd.


